Fragment UI片段
Fragment在设计之初,是为了解决大屏幕下,屏幕划分的问题,但是现在Fragment更多是作为类似标签页的形式存在。
微信底部的标签:

我们选择不同的标签按钮,上方的布局就会跳转到对应的内容。
下面我们看看如何使用Fragment实现这种标签的效果。
Fragment实现标签页
这里我们使用Fragment实现两个标签页之间的切换。
主Activity的布局文件:activity_main.xml
<?xml version="1.0" encoding="utf-8"?>
<RelativeLayout xmlns:android="http://schemas.android.com/apk/res/android"
                android:layout_width="match_parent"
                android:layout_height="match_parent"
                android:paddingLeft="16dp"
                android:paddingRight="16dp">

    <LinearLayout
        android:id="@+id/ll"
        android:layout_width="match_parent"
        android:layout_height="match_parent"
        android:orientation="vertical"/>

    <LinearLayout
        android:layout_width="match_parent"
        android:layout_height="wrap_content"
        android:layout_alignParentBottom="true"
        android:orientation="horizontal">

        <Button
            android:id="@+id/btn_1"
            android:layout_width="0dp"
            android:layout_height="wrap_content"
            android:layout_weight="1"
            android:text="标签1"/>

        <Button
            android:id="@+id/btn_2"
            android:layout_width="0dp"
            android:layout_height="wrap_content"
            android:layout_weight="1"
            android:text="标签2"/>
    </LinearLayout>


</RelativeLayout>
这里我们创建了两个线性布局,第一个线性布局作为容器,容纳Fragment中动态创建的内容,第二个线性布局容纳两个按钮,作为切换标签页之间的标签。
Fragment的两个文件布局
fragment_1.xml
<?xml version="1.0" encoding="utf-8"?>
<LinearLayout xmlns:android="http://schemas.android.com/apk/res/android"
              android:orientation="vertical"
              android:layout_width="match_parent"
              android:layout_height="match_parent">

    <TextView
        android:layout_width="wrap_content"
        android:layout_height="wrap_content"
        android:text="fragment1"/>

    <Button
        android:id="@+id/button"
        android:layout_width="match_parent"
        android:layout_height="wrap_content"
        android:text="Button"/>
</LinearLayout>
这里放了一个按钮,用来演示Fragment中,如何获取控件对象,这里我们就获取按钮对象,并为其添加事件监听器。
fragment_2.xml
<?xml version="1.0" encoding="utf-8"?>
<LinearLayout xmlns:android="http://schemas.android.com/apk/res/android"
              android:orientation="vertical"
              android:layout_width="match_parent"
              android:layout_height="match_parent">

<TextView
    android:layout_width="wrap_content"
    android:layout_height="wrap_content"
    android:text="Fragment2"/>
</LinearLayout>
Fragment1.java
package com.gacfox.fragmentdemo;

import android.app.Fragment;
import android.os.Bundle;
import android.support.annotation.Nullable;
import android.view.LayoutInflater;
import android.view.View;
import android.view.ViewGroup;
import android.widget.Toast;

public class Fragment1 extends Fragment
{
    @Override
    public View onCreateView(LayoutInflater inflater, @Nullable ViewGroup container, Bundle savedInstanceState)
    {
        View view = inflater.inflate(R.layout.fragment_1, null);
        view.findViewById(R.id.button).setOnClickListener(new View.OnClickListener() {
            @Override
            public void onClick(View v)
            {
                Toast.makeText(getActivity(), "fragment1", Toast.LENGTH_SHORT).show();
            }
        });
        return view;
    }
}
onCreateView()是Fragment的生命周期函数之一,我们创建新的Fragment类必须重写这个方法,因为我们要在Fragment中加载布局文件。其参数有一个LayoutInflater,我们需要用这个参数来将布局文件填充成View对象,最终作为返回值返回。因此,我们就可以在这个View对象上使用findViewById()来获取xml布局文件中定义的控件对象。
Fragment2.java
package com.gacfox.fragmentdemo;

import android.app.Fragment;
import android.os.Bundle;
import android.support.annotation.Nullable;
import android.view.LayoutInflater;
import android.view.View;
import android.view.ViewGroup;

public class Fragment2 extends Fragment
{
    @Override
    public View onCreateView(LayoutInflater inflater, @Nullable ViewGroup container, Bundle savedInstanceState)
    {
        View view = inflater.inflate(R.layout.fragment_2, null);
        return view;
    }
}
MainActivity.java
package com.gacfox.fragmentdemo;

import android.app.FragmentManager;
import android.app.FragmentTransaction;
import android.support.v7.app.AppCompatActivity;
import android.os.Bundle;
import android.view.View;
import android.widget.Button;

public class MainActivity extends AppCompatActivity implements View.OnClickListener
{

    @Override
    protected void onCreate(Bundle savedInstanceState)
    {
        super.onCreate(savedInstanceState);
        setContentView(R.layout.activity_main);

        Button button1 = (Button) findViewById(R.id.btn_1);
        button1.setOnClickListener(this);
        Button button2 = (Button) findViewById(R.id.btn_2);
        button2.setOnClickListener(this);

    }

    @Override
    public void onClick(View v)
    {
        FragmentManager fragmentManager = getFragmentManager();
        FragmentTransaction fragmentTransaction = fragmentManager.beginTransaction();

        switch (v.getId())
        {
            case R.id.btn_1:
                fragmentTransaction.replace(R.id.ll, new Fragment1());
                break;
            case R.id.btn_2:
                fragmentTransaction.replace(R.id.ll, new Fragment2());
                break;
        }
        fragmentTransaction.commit();
    }
}
我们使用了一个fragmentManager对象,这个对象可以看做一个Activity的Fragment管理器,我们通过按钮的点击事件对Fragment进行操作。注意这里的写法,实际上我觉得比较怪异,居然和事务搭上了关系,我们要先获得一个fragmentTransaction对象,使用replace()方法修改Fragment对象,最终commit,实际上不需要搞得这么奇怪,不知道框架设计者是怎么想的,这里我们知道这么写就行了。
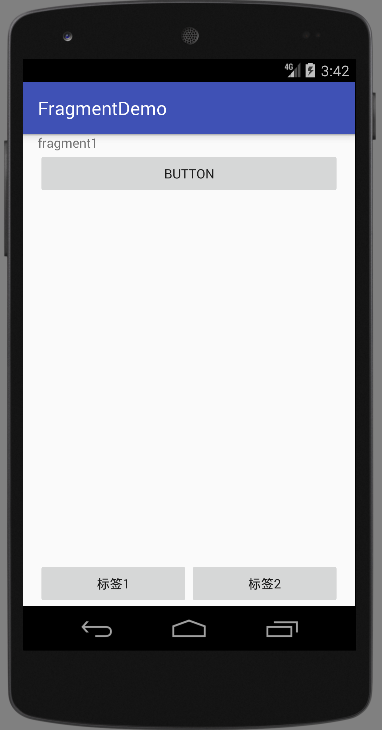
运行结果:
Fragment的生命周期
首先我们要知道,Fragment为什么叫片段,因为它是依附于一个Activity的,上面例子中我们也看到了,使用Fragment,我们需要调用Activity的方法getFragmentManager()。因此,Fragment的生命周期也是依附于Activity的。
官网给出的Fragment的生命周期图:
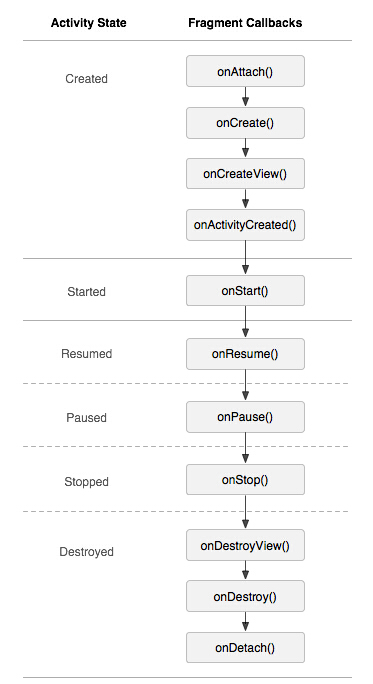
Fragment比Activity多了几个生命周期函数。