通知 Notification
Android系统有一个通知栏,任何一个应用都可以向通知栏发送通知,提醒用户一些事情,比如微信当有新消息时,就会发送一个通知,点击这个通知就可以跳转到聊天界面。除此之外,通知还有其他重要的使用场景:
- 音乐播放器中,可以使用一个Notification作为后台Service的控制条。
- 下载器,可以用一个Notification作为后台下载线程的进度条。
- 日程提醒工具,可以用通知结合声音、震动的方式,实现用户日程提醒。
下面我们就分别看看这几种使用场景下,该如何使用Notification。
PendingIntent
在学习Notification之前,我们需要了解一下这个PendingIntent。我们学过Intent,知道如何使用一个Intent启动Activity或是Service。Intent一旦发出,那么对应的组件就会立即启动,而PendingIntent则是先将意图赋予一个对象(一般就是Notification),这个Notification可以脱离Activity或是Service存在。当满足某些条件的情况下,意图被触发时,Intent才被发送。
创建一个PendingIntent
Intent intent = new Intent(this, ContentActivity.class);
PendingIntent pendingIntent = PendingIntent.getActivity(this, 0, intent, PendingIntent.FLAG_UPDATE_CURRENT);
我们首先需要一个Intent对象,这个Intent对象就是最终执行的意图,如果我们需要传递数据,就可以放在这个Intent中。
PendingIntent类有三个静态方法:
getActivity()getService()getBroadcast()
分别对应打开Activity组件,Service组件,广播组件。
第一个参数Context,我们使用当前Activity即可。第二个参数是请求ID,现在已弃用,填0。第三个参数是待发送的Intent对象,我们需要事先准备好。第四个参数其实和第二个参数有关,是有相同请求ID的PendingIntent出现时的处理方式,由于第二个参数已经不用了,因此这里我们固定填PendingIntent.FLAG_UPDATE_CURRENT。
如何将PendingIntent赋予Notification,将在下面叙述。
简单提醒
简单提醒功能实现这样一种功能:应用在某个情况下,向通知栏发送了一个通知,用户点击这个通知后,就跳转到这个应用的一个Activity中。
activity_main.xml
<?xml version="1.0" encoding="utf-8"?>
<LinearLayout xmlns:android="http://schemas.android.com/apk/res/android"
              android:layout_width="match_parent"
              android:layout_height="match_parent"
              android:paddingLeft="16dp"
              android:paddingRight="16dp"
              android:orientation="vertical" >
    <Button
        android:layout_width="match_parent"
        android:layout_height="wrap_content"
        android:text="发出一个通知"
        android:onClick="popNotification"/>
</LinearLayout>
activity_content.xml
<?xml version="1.0" encoding="utf-8"?>
<LinearLayout xmlns:android="http://schemas.android.com/apk/res/android"
              android:layout_width="match_parent"
              android:layout_height="match_parent"
              android:paddingLeft="16dp"
              android:paddingRight="16dp"
              android:orientation="vertical" >
    <TextView
        android:layout_width="wrap_content"
        android:layout_height="wrap_content"
        android:text="内容Activity"/>
</LinearLayout>
MainActivity.java
package com.gacfox.notificationdemo;

import android.app.Notification;
import android.app.NotificationManager;
import android.app.PendingIntent;
import android.content.Context;
import android.content.Intent;
import android.support.v7.app.AppCompatActivity;
import android.os.Bundle;
import android.support.v7.app.NotificationCompat;
import android.view.View;

public class MainActivity extends AppCompatActivity
{

    @Override
    protected void onCreate(Bundle savedInstanceState)
    {
        super.onCreate(savedInstanceState);
        setContentView(R.layout.activity_main);
    }

    /**
     * 发送通知
     */
    public void popNotification(View view)
    {
        //获取通知构造器
        NotificationCompat.Builder builder = new NotificationCompat.Builder(this);
        //设置通知参数,这里设置的分别是图标,标题,内容,时间
        builder.setSmallIcon(R.mipmap.ic_launcher).setContentTitle("通知").setContentText("通知内容").setWhen(System.currentTimeMillis());
        //设置通知意图
        Intent intent = new Intent(this, ContentActivity.class);
        PendingIntent pendingIntent = PendingIntent.getActivity(this, 0, intent, PendingIntent.FLAG_UPDATE_CURRENT);
        builder.setContentIntent(pendingIntent);
        //构造通知,获得Notification对象
        Notification notification = builder.build();

        //发送通知
        NotificationManager manager = (NotificationManager) getSystemService(Context.NOTIFICATION_SERVICE);
    //第一个参数是通知ID,相同ID的通知只能有一个,想发送多个通知就要设置不同ID
        manager.notify(1, notification);

    }
}
ContentActivity.java
package com.gacfox.notificationdemo;

import android.support.v7.app.AppCompatActivity;
import android.os.Bundle;

public class ContentActivity extends AppCompatActivity
{

    @Override
    protected void onCreate(Bundle savedInstanceState)
    {
        super.onCreate(savedInstanceState);
        setContentView(R.layout.activity_content);
    }
}
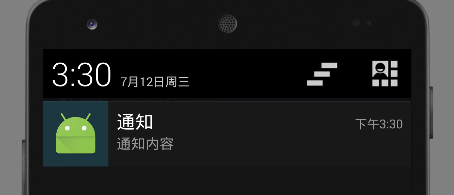
这里为了简单起见,我们就在MainActivity中做了一个按钮,点击按钮就会发送一个通知,点击这个通知,就会跳转到ContentActivity。ContentActivity中只有一个TextView。
这里我们主要关注如何发送一个通知。首先我们需要一个NotificationCompat.Builder,它可以叫做通知对象的构造工具类。我们在其上设置了若干属性,最终调用builder.build()获得Notification对象。为了发送通知对象,我们还需要一个NotificationManager,这是一个系统服务,因此我们需要使用getSystemService()来获取。最终调用manager.notify()方法发送通知(不要和线程相关的那个notify()函数弄混,两个完全是不同意义的函数)。
总结Notification的使用步骤:获取构造工具类实例->设置Notification属性->使用NotificationManager发送该消息
运行效果:
一些常用的Notification属性用法
注:以下属性有关铃声,震动等,建议实机调试。属性值可以用或运算|连接,实现设置多个属性值。
设置消息发出时提示音和手机震动效果
builder.setDefaults(Notification.DEFAULT_ALL)
DEFAULT_SOUND提示音,这个声音是系统自带的DEFAULT_LIGHTS三色灯,具体效果视手机硬件而定,可能没有任何效果DEFAULT_VIBRATE震动,需要VIBRATE权限(我使用我的红米Note手机时,并没有加上这个权限,但是也能震动)DEFAULT_ALL以上三种效果都具备,我们默认使用这个属性就可以了
设置Notification的一些flag
notification.flags = Notification.FLAG_AUTO_CANCEL
Notification.FLAG_SHOW_LIGHTS使用三色灯时必须加此标志Notification.FLAG_ONGOING_EVENT发起正在运行的事件Notification.FLAG_INSISTENT让声音、震动无限循环,直到用户响应这个Notification,实测是手机打开通知栏循环就停止了,可以用来作闹钟Notification.FLAG_ONLY_ALERT_ONCE震动和提示音只执行一次Notification.FLAG_AUTO_CANCEL用户响应该Notification后,自动关闭(默认即使响应该Notification后也不自动关闭,建议加上这个flag)Notification.FLAG_NO_CLEAR无法清除的Notification,除非进程停止Notification.FLAG_FOREGROUND_SERVICE表示正在运行的服务
设置震动方式
builder.setVibrate(new long[]{1000, 1000, 1000, 2000})
上面代码表示震动方式是:延迟1s->震动1s->延迟1s->震动2s
主动关闭Notification
manager.cancel(DOWNLOAD_NOTIFICATION_ID);
NotificationManager.cancel()可以主动关闭Notification,参数是NotificationID。
进度条Notification
这里在上一个例子基础上,我们在Notification中加一个进度条,然后使用后台Service控制进度条的进度。
DownloadService.java
package com.gacfox.notificationdemo;

import android.app.IntentService;
import android.app.Notification;
import android.app.NotificationManager;
import android.app.PendingIntent;
import android.content.Intent;
import android.content.Context;
import android.support.annotation.Nullable;
import android.support.v7.app.NotificationCompat;

public class DownloadService extends IntentService
{

    private static int DOWNLOAD_NOTIFICATION_ID = 1;

    public DownloadService()
    {
        super("Download Service");
    }

    @Override
    protected void onHandleIntent(@Nullable Intent intent)
    {

        //获取通知构造器
        NotificationCompat.Builder builder = new NotificationCompat.Builder(this);
        //设置通知参数,这里设置的分别是图标,标题,内容,时间
        builder
                .setSmallIcon(R.mipmap.ic_launcher)
                .setContentTitle("下载")
                .setWhen(System.currentTimeMillis());

        //设置通知意图
        Intent notificationIntent = new Intent(this, ContentActivity.class);
        PendingIntent pendingIntent = PendingIntent.getActivity(this, 0, notificationIntent, PendingIntent.FLAG_UPDATE_CURRENT);
        builder.setContentIntent(pendingIntent);


        for(int i = 0; i < 100; i++)
        {
            try
            {
                Thread.sleep(100);

                //设置进度
                builder.setContentText(i + "%").setProgress(100, i, false);
                sendNotification(builder);
            }
            catch (InterruptedException e)
            {
                e.printStackTrace();
            }
        }

        builder.setContentText("下载完成");
        sendNotification(builder);
    }

    private void sendNotification(NotificationCompat.Builder builder)
    {
        //构造通知,获得Notification对象
        Notification notification = builder.build();
        //发送通知
        NotificationManager manager = (NotificationManager) getSystemService(Context.NOTIFICATION_SERVICE);
        //第一个参数是通知ID,相同ID的通知只能有一个,想发送多个通知就要设置不同ID
        manager.notify(DOWNLOAD_NOTIFICATION_ID, notification);
    }
}
这里我们继承了一个IntentService实现一个后台下载服务,这里没有实际下载数据,而是用循环模拟的。每次循环都发送新的Notification,但是我们注意,Notification的ID都是相同的,这样旧的Notification就会不断被覆盖,呈现出进度条前进的效果。
注:onHandleIntent()方法是在新线程中调用的,执行完成后会自动关闭自己。