布局文件
布局文件存放在res/layout下,命名规则:例如MainActivity对应布局文件就叫activity_main.xml,一个对话框的布局就叫dialog_xxx.xml。创建一个新的Android工程后,Android Studio会自动为我们创建一个布局文件,我们再它的基础上修改就行了。
实际上编写布局文件时,控件、布局的可用选项是非常之多的,这里不可能一一介绍。我们使用Android Studio时,多使用代码提示功能,遇到难解决的问题,先看看文档怎么说。
布局
线性布局和相对布局是Android中最常用的两种布局类型。下面我们具体看一看如何编写这两种布局。
线性布局
一个空的线性布局代码:
<LinearLayout xmlns:android="http://schemas.android.com/apk/res/android"
              android:layout_width="match_parent"
              android:layout_height="match_parent"
              android:paddingLeft="16dp"
              android:paddingRight="16dp"
              android:orientation="vertical" >
</LinearLayout>
orientation:布局方向 vertical,垂直;horizontal,水平。例如垂直的线性布局,那么控件就是从上到下排列的。
其他属性都很好理解。
线性布局中控件可用的属性:
gravity:对齐方式,子控件相对于当前控件的对齐方式(当前控件是父控件)。layout_gravity:当前控件相对于父控件的对齐方式(当前控件是子控件)。layout_weight:这个可以理解为占据剩余高度(或宽度)的权重。具体计算方式请参考文档,个人认为设计的不是很好,这里只说最佳实践:当布局是垂直线性布局时,请把layout_height设为0dp,当布局是水平线性布局时,请把layout_width设为0dp,否则会产生意想不到的效果。
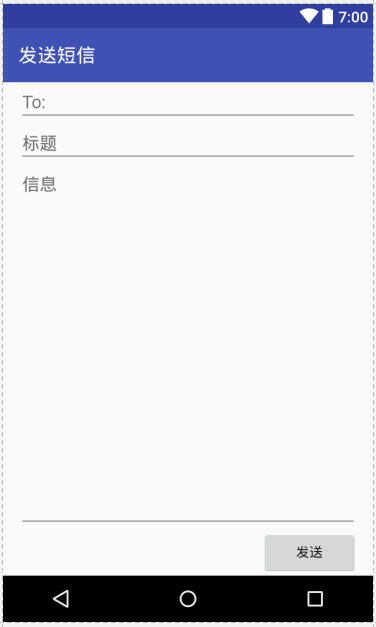
我们直接看一个具体例子,短信发送界面:
<?xml version="1.0" encoding="utf-8"?>
<LinearLayout xmlns:android="http://schemas.android.com/apk/res/android"
              android:layout_width="match_parent"
              android:layout_height="match_parent"
              android:paddingLeft="16dp"
              android:paddingRight="16dp"
              android:orientation="vertical">
    <EditText
        android:layout_width="match_parent"
        android:layout_height="wrap_content"
        android:hint="@string/to" />
    <EditText
        android:layout_width="match_parent"
        android:layout_height="wrap_content"
        android:hint="@string/subject" />
    <EditText
        android:layout_width="match_parent"
        android:layout_height="0dp"
        android:layout_weight="1"
        android:gravity="top"
        android:hint="@string/message" />
    <Button
        android:layout_width="100dp"
        android:layout_height="wrap_content"
        android:layout_gravity="end"
        android:text="@string/send" />
</LinearLayout>
注意第三个EditText,我们把layout_height设置为了0dp,然后加上了android:layout_weight="1",表示占据剩余空间的比重为1。由于没有其他控件设置这个属性,因此它就表示该EditText占据全部剩余空间。还要注意它的gravity属性,这个属性指定的是该EditText里面的hint相对EditText的位置为Top。
除此之外,我们还使用了例如:@string/send的形式引用字符串,这些字符串资源配置在了strings.xml中。实际上,纯粹面向中文用户的app此处直接写字符串值也没什么问题,这里只是为了说明问题。
渲染结果:
相对布局
空的相对布局代码:
<RelativeLayout xmlns:android="http://schemas.android.com/apk/res/android"
                android:layout_width="match_parent"
                android:layout_height="match_parent"
                android:paddingLeft="16dp"
                android:paddingRight="16dp" >
</RelativeLayout>
相对布局控件可用的属性:
- layout_below:位于哪个控件的下方。
- layout_above:位于哪个控件的上方。
- layout_toLeftOf:指定当前控件位于哪个控件的左边。
- layout_toRightOf:指定当前控件位于哪个控件的右边。
- layout_alignParentRight:当前控件基于父窗体的对齐方式。
- layout_centerHorizontal:水平居中。
- layout_centerVertical:垂直居中。
- layout_centerInParent:位于父窗体的中间。
这个相对布局也是十分好理解的,实际上我们就是从一个控件开始,其他控件都指定相对于这个控件如何摆放,之后的控件以此类推,最终形成最后的布局。这种布局比线性布局稍微难用一点,我们需要在编写前大致计划好控件如何摆放,谁第一个放,这样才能做到在不同大小屏幕下显示一致的效果。
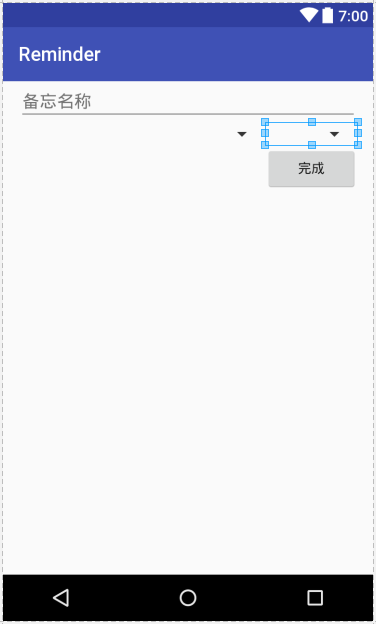
相对布局例子:
<?xml version="1.0" encoding="utf-8"?>
<RelativeLayout xmlns:android="http://schemas.android.com/apk/res/android"
                android:layout_width="match_parent"
                android:layout_height="match_parent"
                android:paddingLeft="16dp"
                android:paddingRight="16dp" >
    <EditText
        android:id="@+id/name"
        android:layout_width="match_parent"
        android:layout_height="wrap_content"
        android:hint="备忘名称" />
    <Spinner
        android:id="@+id/dates"
        android:layout_width="0dp"
        android:layout_height="wrap_content"
        android:layout_below="@id/name"
        android:layout_alignParentLeft="true"
        android:layout_toLeftOf="@+id/times" />
    <Spinner
        android:id="@id/times"
        android:layout_width="96dp"
        android:layout_height="wrap_content"
        android:layout_below="@id/name"
        android:layout_alignParentRight="true" />
    <Button
        android:layout_width="96dp"
        android:layout_height="wrap_content"
        android:layout_below="@id/times"
        android:layout_alignParentRight="true"
        android:text="完成" />
</RelativeLayout>
这个布局还是很容易理解的,要注意:因为相对摆放要知道相对的是“谁”,因此我们对某些控件使用类似@+id/name的形式,定义了id属性。
关于相对布局的技巧补充
相对布局可以说是比较“万能”的布局,凭我经验来说,一遇到其他布局解决不了的问题,就会切换到相对布局进行解决。这里有一个补充的注意点。
现在要求这样一个布局:屏幕上方有一个ListView,下方有一个包含按钮的子布局,要求这个线性布局高度不变,且无论ListView多高,子布局都处于屏幕底部。我们直接看看一个例子代码:
<RelativeLayout xmlns:android="http://schemas.android.com/apk/res/android"
              android:layout_width="match_parent"
              android:layout_height="match_parent">

    <RelativeLayout
        android:id="@+id/rl_bottom_btn_group"
        android:layout_alignParentBottom="true"
        android:layout_width="match_parent"
        android:layout_height="wrap_content"
        android:background="@color/lightGrayBackground"
        android:padding="5dp">
        <Button
            android:id="@+id/btn_create_schedule"
            android:layout_centerHorizontal="true"
            android:text="@string/create_schedule"
            android:layout_width="wrap_content"
            android:layout_height="wrap_content"/>
    </RelativeLayout>

    <ListView
        android:id="@+id/lv_schedule"
        android:layout_marginLeft="5dp"
        android:layout_marginRight="5dp"
        android:layout_width="match_parent"
        android:layout_height="wrap_content"
        android:layout_above="@id/rl_bottom_btn_group"/>

</RelativeLayout>
我们为子布局指定了android:layout_alignParentBottom="true",但是如果仅仅是这样的话,会造成子布局把ListView最后一行挡住。如果给子布局设定layout_below,那么它就不可能一直处于屏幕底部。此时的解决办法是为上方的ListView指定layout_above。但是我们观察代码可以发现我们先定义的子布局,这是因为如果layout_above引用了后定义的控件id,gradle构建会报错,我们必须顺序的为控件赋予id才行。
帧布局、表格布局、绝对布局
这些应该是用的比较少了,基本不会用到。大部分效果都可以通过线性布局、相对布局和各种控件组合得到。
引用资源
在布局xml文件中,经常出现@符号,这个符号有两种用途:定义一个控件的资源id供其他地方使用,和引用资源。
@+id/xxx定义该控件id为xxx@id/xxx引用id为xxx的控件@string/xxx引用string.xml中定义的字符串。不只是字符串资源,图片资源也是可以这样使用的。
引用资源例子:
activity_main.xml
<EditText
    android:layout_width="match_parent"
    android:layout_height="wrap_content"
    android:hint="@string/to" />
strings.xml
<resources>
    <string name="app_name">Test01</string>
    <string name="to">To:</string>
    <string name="subject">标题</string>
    <string name="message">信息</string>
    <string name="send">发送</string>
    <string name="send_activity">发送短信</string>
</resources>
我们使用android:hint定义了这个EditText的提示信息,其值是@string/to,这是一个字符串资源,定义在res/values/strings.xml中。
AndroidStudio布局文件编辑器
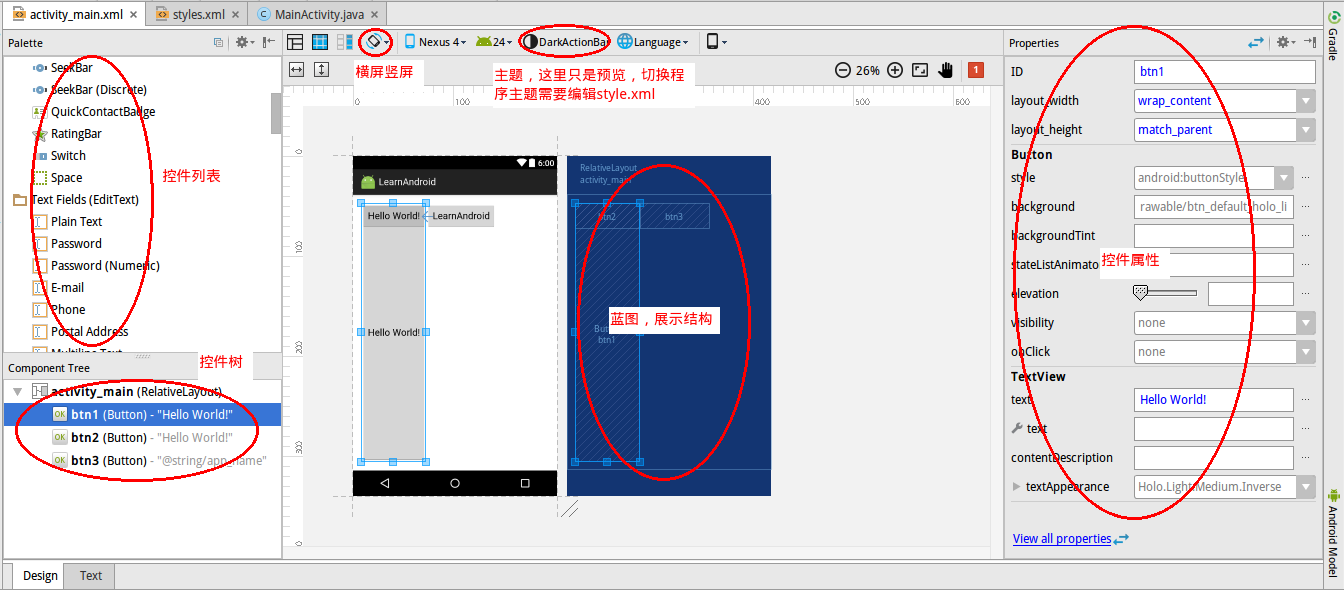
手写xml时如果忘了控件叫什么名字或者不知道想要的属性是什么,可以在布局编辑器中找一找,布局复杂时可以借助控件树和蓝图便于观察,蓝图和主题预览都是强大的辅助设计工具。