整合Spring和Struts2
这篇笔记记录如何整合struts2框架和spring框架。这里使用的是Intellij IDEA,构建工具使用gradle,struts2和Spring大部分使用注解配置,少量使用XML配置。
引入gradle依赖
dependencies {
    //测试框架
    testCompile group: 'junit', name: 'junit', version: '4.12'
    //struts2核心
    compile group: 'org.apache.struts', name: 'struts2-core', version: '2.3.34'
    //struts2的spring整合插件
    compile group: 'org.apache.struts', name: 'struts2-spring-plugin', version: '2.3.34'
    //struts2的注解配置插件
    compile group: 'org.apache.struts', name: 'struts2-convention-plugin', version: '2.3.34'

    //spring核心,上下文,装配功能
    compile group: 'org.springframework', name: 'spring-core', version: '3.2.18.RELEASE'
    compile group: 'org.springframework', name: 'spring-context', version: '3.2.18.RELEASE'
    compile group: 'org.springframework', name: 'spring-beans', version: '3.2.18.RELEASE'
}
编写Spring配置文件
在WEB-INF下,创建applicationContext.xml文件,并设置注解扫描。
<?xml version="1.0" encoding="UTF-8"?>
<beans xmlns="http://www.springframework.org/schema/beans"
       xmlns:xsi="http://www.w3.org/2001/XMLSchema-instance"
       xmlns:context="http://www.springframework.org/schema/context"
       xmlns:jee="http://www.springframework.org/schema/jee"
       xsi:schemaLocation="http://www.springframework.org/schema/beans
       http://www.springframework.org/schema/beans/spring-beans.xsd
       http://www.springframework.org/schema/context
       http://www.springframework.org/schema/context/spring-context.xsd
       http://www.springframework.org/schema/jee
       http://www.springframework.org/schema/jee/spring-jee.xsd">
    <context:component-scan base-package="com.gacfox.service,com.gacfox.action"/>
</beans>
注:注解扫描包需要包含action所在的包,否则没法依赖注入。Action类也需要使用@Component标注。
编写struts2配置文件
<?xml version="1.0" encoding="UTF-8" ?>
<!DOCTYPE struts PUBLIC
        "-//Apache Software Foundation//DTD Struts Configuration 2.3//EN"
        "http://struts.apache.org/dtds/struts-2.3.dtd">
<struts>
    <package name="p1" extends="struts-default"/>
</struts>
注:为了测试,struts2配置文件里我新建了一个package。
编写web.xml
<?xml version="1.0" encoding="UTF-8"?>
<web-app xmlns:xsi="http://www.w3.org/2001/XMLSchema-instance"
         xmlns="http://java.sun.com/xml/ns/javaee"
         xsi:schemaLocation="http://java.sun.com/xml/ns/javaee http://java.sun.com/xml/ns/javaee/web-app_3_0.xsd"
         id="WebApp_ID" version="3.0">
    <display-name>Struts2 Demo</display-name>

    <!-- SpringContext 监听器-->
    <listener>
        <listener-class>org.springframework.web.context.ContextLoaderListener</listener-class>
    </listener>

    <!--struts2 核心过滤器-->
    <filter>
        <filter-name>struts2</filter-name>
        <filter-class>org.apache.struts2.dispatcher.ng.filter.StrutsPrepareAndExecuteFilter</filter-class>
    </filter>
    <filter-mapping>
        <filter-name>struts2</filter-name>
        <url-pattern>/*</url-pattern>
    </filter-mapping>

</web-app>
测试
为了说明如何标注注解,下面简单写了一个例子,请求Action,调用Service,什么都不做直接返回一个JSP。
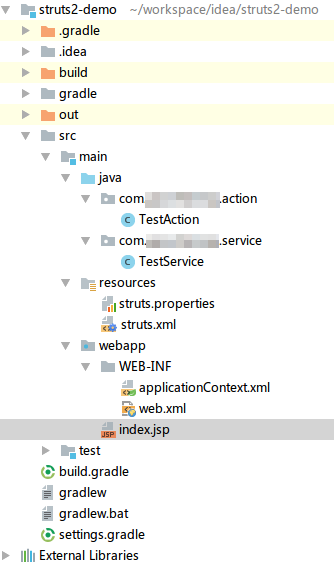
项目结构
TestAction.java
package com.gacfox.action;

import com.gacfox.service.TestService;
import com.opensymphony.xwork2.ActionSupport;
import org.apache.struts2.convention.annotation.Action;
import org.apache.struts2.convention.annotation.ParentPackage;
import org.apache.struts2.convention.annotation.Result;
import org.springframework.beans.factory.annotation.Autowired;
import org.springframework.stereotype.Component;

@ParentPackage("p1")
@Component
public class TestAction extends ActionSupport
{
    private TestService testService;

    @Autowired
    public TestAction(TestService testService)
    {
        this.testService = testService;
    }

    @Action(value = "test", results = {@Result(name = "success", location = "/index.jsp")})
    public String test()
    {
        testService.test();
        System.out.println("action");
        return SUCCESS;
    }
}
TestService.java
package com.gacfox.service;

import org.springframework.stereotype.Service;

@Service
public class TestService
{
    public void test()
    {
        System.out.println("service");
    }
}
作者:Gacfox
版权声明:本网站为非盈利性质,文章如非特殊说明均为原创,版权遵循知识共享协议CC BY-NC-ND 4.0进行授权,转载必须署名,禁止用于商业目的或演绎修改后转载。